External hard drives are portable storage devices that can be connected to your computer via USB, Thunderbolt, or other interfaces. They offer a convenient way to store and transfer large files, such as photos, videos, and documents.
Preparing Your External Hard Drive
Before you can access the files on your external hard drive, you’ll need to physically connect it to your PC. Here’s how:
- Locate the USB port: On most PCs, you’ll find USB ports on the front, back, or sides of the device.
- Connect the cable: Plug the USB cable from your external hard drive into a USB port on your PC.
- Wait for detection: Your computer should automatically detect the new hardware and install any necessary drivers.
Accessing Your External Hard Drive
Once your external hard drive is connected and recognized by your PC, you can access its contents. Here are the steps:
- Open File Explorer: On Windows, you can open File Explorer by clicking on the folder icon in the taskbar. On macOS, you can open Finder by clicking on the dock icon.
- Locate the drive: In File Explorer or Finder, you should see a new drive listed under “This PC” (Windows) or “Devices” (macOS). The drive’s name will typically match the label on the external hard drive.
- Double-click the drive: Double-clicking the drive will open a window containing the files and folders stored on the drive.
Troubleshooting any connection issues
If you’re experiencing problems connecting your external hard drive to your PC, here are some troubleshooting steps you can try:
Check the Physical Connection:
- Ensure secure connections: Make sure the USB cable is firmly plugged into both the external hard drive and your PC.
- Try a different port: If possible, test the drive in a different USB port on your PC.
- Inspect the cable: Check the cable for any visible damage, such as frayed wires or bent connectors. If necessary, replace the cable.
Check for Hardware Conflicts:
- Disconnect other devices: Temporarily disconnect any other USB devices connected to your PC to see if the conflict is caused by another device.
- Disable power-saving features: Some power-saving features on your PC might interfere with USB connections. Try disabling them temporarily.
Test on Another Computer:
- Isolate the issue: If possible, connect the external hard drive to another computer to see if the problem persists. This can help determine if the issue is with the drive or your PC.
Use a USB Hub:
- Boost power: If you’re using a USB hub, try connecting the external hard drive directly to a USB port on your PC to see if that resolves the issue. Some USB hubs might not provide enough power for certain devices.
Check for Disk Errors:
- Scan for errors: Use disk utility software to scan the external hard drive for errors. If you find any errors, you may need to repair them or recover lost data before proceeding.
Consult a Professional:
- Seek expert help: If you’ve tried all of the above steps and are still unable to connect your external hard drive, consider consulting a computer technician for professional assistance.
By following these steps, you should be able to identify and resolve most connection issues with your external hard drive.
Troubleshooting Common Issues
If you’re unable to access your external hard drive, try the following troubleshooting steps:
- Check the connection: Ensure that the USB cable is securely connected to both the external hard drive and your PC.
- Try a different port: If possible, try plugging the cable into a different USB port on your PC.
- Check the drive’s health: Use disk utility software to scan the drive for errors. If you find any issues, you may need to recover lost data before formatting the drive.
- Update drivers: Make sure you have the latest drivers installed for your external hard drive and your PC’s USB ports.
Transferring Data to and from the External Hard Drive
Once you’ve connected your external hard drive to your PC, you can easily transfer data to and from it. Here’s how:
Transferring Data to Your External Hard Drive:
- Copy the files: Locate the files you want to transfer on your computer. Select them and press Ctrl+C (Windows) or Command+C (macOS) to copy them.
- Paste to the external drive: Open the folder on your external hard drive where you want to save the files. Press Ctrl+V (Windows) or Command+V (macOS) to paste the copied files.
- Monitor progress: The transfer progress will be displayed on your screen. Wait for the transfer to complete before disconnecting the drive.
Transferring Data from Your External Hard Drive:
- Locate the files: Open the folder on your external hard drive that contains the files you want to transfer.
- Copy the files: Select the files you want to copy and press Ctrl+C (Windows) or Command+C (macOS).
- Paste to your computer: Open the folder on your computer where you want to save the files. Press Ctrl+V (Windows) or Command+V (macOS) to paste the copied files.
- Monitor progress: The transfer progress will be displayed on your screen. Wait for the transfer to complete before disconnecting the drive.
Additional Tips:
- Create folders: Organize your files on your external hard drive by creating folders. This will make it easier to find and manage your data.
- Use drag-and-drop: You can also transfer files by dragging and dropping them between folders on your computer and your external hard drive.
- Consider using a backup software: For regular backups, consider using backup software that can automatically transfer files to and from your external hard drive.
By following these steps, you can easily transfer data between your computer and your external hard drive.
Formatting Your External Hard Drive
If you need to erase all the data on your external hard drive, you can format it. However, be aware that formatting will delete all files on the drive, so make sure to back up any important data before proceeding.
To format a drive on Windows:
- Right-click on the drive: In File Explorer, right-click on the drive you want to format.
- Select “Format”: Choose the “Format” option from the context menu.
- Choose file system: Select the desired file system (e.g., NTFS, FAT32) and other formatting options.
- Click “Start”: Click the “Start” button to begin the formatting process.
To format a drive on macOS:
- Open Disk Utility: Launch Disk Utility from the Applications folder.
- Select the drive: Select the portable hard drive in the sidebar.
- Click “Erase”: Click the “Erase” button at the top of the window.
- Choose format: Select the desired format (e.g., Mac OS Extended, APFS) and other options.
- Click “Erase”: Click the “Erase” button again to start the formatting process.
Importance of safely ejecting the external hard drive
Safely ejecting your portable hard drive is crucial to prevent data corruption and potential hardware damage. Here’s why:
- Prevent Data Loss: When you abruptly disconnect an portable hard drive without properly ejecting it, the operating system might still be accessing data or writing to the drive. This can lead to inconsistent data or even data loss if the drive is disconnected during a write operation.
- Avoid Hardware Damage: Abrupt disconnection can also cause physical damage to the hard drive. The drive’s internal components are designed to stop and start in a controlled manner. Sudden disconnection can disrupt this process and potentially lead to hardware failures.
- Maintain Data Integrity: Safely ejecting the drive ensures that all data is written to the drive correctly and that there are no inconsistencies. This helps maintain the integrity of your data and prevents future problems.
How to Safely Eject Your External Hard Drive:
- Windows:
- Click on the “Safely Remove Hardware and Eject Media” icon in the system tray.
- Select the portable hard drive from the list and click “Eject.”
- macOS:
- Drag the portable hard drive icon to the Trash.
- Wait for the “Eject” icon to appear on the drive, then click it.
By following these simple steps, you can protect your data and prolong the life of your portable hard drive.
Additional Tips
- Label your drives: Give your portable hard drives descriptive labels to help you identify them easily.
- Back up regularly: Regularly back up your important files to your portable hard drive or another storage device to protect against data loss.
- Disconnect safely: Always use the “Safely Remove Hardware” option in Windows or the “Eject” icon in macOS before disconnecting your portable hard drive.
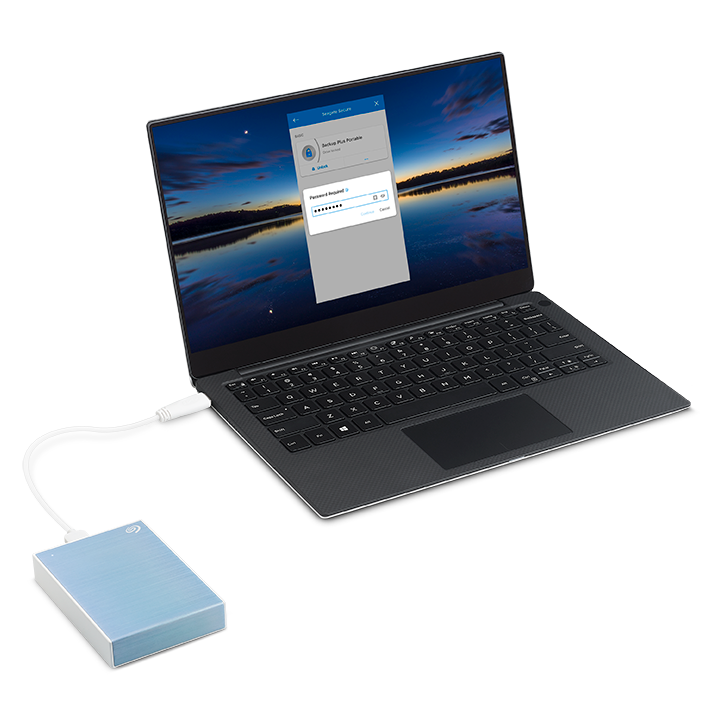
- Consider encryption: If you’re concerned about data security, consider using encryption software to protect the data on your portable hard drive.
By following these guidelines, you should be able to successfully connect, access, and manage your portable hard drive on your PC.