Common Reasons for Drive Invisibility
When you plug an external hard drive into your Windows 11 computer and it doesn’t show up, you may feel confused. This issue can arise due to several reasons:
- USB ports may be faulty or not connected properly.
- The external hard drive might not be initialized, or lacks a proper format.
- Perhaps there’s an outdated or corrupt device driver.
- The drive could be missing a drive letter, making it invisible to the system.
- Incompatibility between the file system of the hard drive and Windows 11.
- Hardware problems or damage to the external hard drive itself.
By understanding these common culprits, you can start to troubleshoot the problem effectively. Fixing the issue usually involves checking connections, updating drivers, or making changes in Disk Management. To avoid data loss, always ensure you’re performing these operations cautiously.
Checking USB Ports and Connections
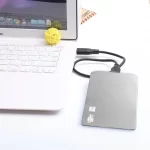
One of the first steps in detecting why an external hard drive is not visible is to examine the USB ports and connections. Often, the issue might be quite simple—perhaps the USB cable is loosely connected or the port is malfunctioning. Follow these tips to ensure proper connectivity:
- Firmly plug in the external hard drive’s USB cable into the port, ensuring a snug fit without forcing it.
- Try connecting the device to different USB ports on your computer to rule out a faulty port.
- Test the external hard drive on another computer. If it works there, the problem might be with your Windows 11 system’s USB ports.
- If you’re using a USB hub, connect the hard drive directly to the computer to avoid issues that can arise from insufficient power.
- Check for physical damage on the USB ports, cables, and connectors. Sometimes, debris or wear can cause poor contact.
By ensuring the USB connections are secure and functioning, you may quickly resolve the issue of an external hard drive not showing up in Windows 11. If the drive is still not visible after these checks, further steps may need to be taken to diagnose the issue.
Enabling Automounting for External Drives
If your external hard drive is still not visible in Windows 11, try enabling automount. This feature helps Windows to recognize new storage devices automatically. Here’s how to enable it:
- Press ‘Windows+R’ keys and type ‘cmd’ to open Command Prompt.
- Make sure to run it as administrator by pressing ‘Ctrl+Shift+Enter’.
- In the Command Prompt window, type
mountvol /Eand hit the ‘Enter’ key. This will enable automounting. - You can also remove old mount points by typing
mountvol /Rand pressing ‘Enter’.
Enabling automount can resolve issues where Windows does not automatically assign a drive letter to new drives. It is especially useful when you add multiple hard drives to your system or if you frequently switch between different external storage devices. After enabling automounting, disconnect and reconnect your external drive to see if Windows 11 now recognizes it. If this doesn’t work, consider the next troubleshooting steps outlined in this blog.
Formatting Your External Hard Drive Correctly
When Windows 11 fails to recognize an external hard drive, formatting it correctly is vital. Here’s what you should do:
- Check the File System: Ensure the hard drive has a file system that Windows 11 can recognize. NTFS, FAT32, and exFAT are widely supported file systems.
- Use Disk Management: Access Disk Management by right-clicking ‘Start’, and selecting ‘Disk Management’. Locate your drive, right-click it, and choose ‘Format’. Be cautious, as this will erase all data on the drive.
- Assign a File System: Choose either NTFS for Windows-only use, FAT32 for older and smaller drives, or exFAT for compatibility with Windows and Mac. Enter a volume label to easily identify your drive.
- Perform a Quick Format: Check ‘Perform a quick format’ for a faster process. Note that this does not check the disk for bad sectors. For a thorough format, uncheck this option.
- Confirm and Format: Review your choices and click ‘OK’ to format. Once the process completes, your drive should be visible if the issue was a formatting error.
Remember, formatting deletes all data on the external hard drive. Back up your files before you start if possible. If Windows 11 still does not recognize the drive after formatting, there may be deeper issues at play, such as driver or hardware problems.
Updating or Reinstalling Hard Drive Drivers
Sometimes the external hard drive may not show up in Windows 11 due to driver issues. Drivers enable your computer’s software to communicate with the hardware. If they’re outdated or corrupt, this communication breaks down. Here’s how to update or reinstall drivers:
- Update Drivers: Open ‘Device Manager’ by right-clicking the ‘Start’ button. Expand ‘Disk drives’, right-click your external drive, and select ‘Update driver’. Choose ‘Search automatically for updated driver software’ to let Windows find and install the latest driver.
- Reinstall Drivers: In ‘Device Manager’, right-click your external drive and select ‘Uninstall device’. Then, disconnect the drive and restart your computer. Reconnect the drive; Windows 11 should automatically reinstall the driver.
If updating or reinstalling drivers doesn’t fix the problem, you may need to visit the hard drive manufacturer’s website. They often have the most up-to-date drivers available for download. Always use the drivers that match your specific model number and Windows version to avoid further issues.
By keeping your drivers up-to-date or reinstalling them, you increase the chances that Windows 11 will recognize your external hard drive. If the problem persists, continue with the additional troubleshooting steps provided in this blog.
Initializing New External Hard Drives
Not all new external hard drives come ready to use with Windows 11. They may require initialization. Initialization is a process that prepares the drive to be used by the system. It involves setting up a partition style, which can be either Master Boot Record (MBR) or GUID Partition Table (GPT). Here are the steps to initialize a new external hard drive in Windows 11:
- Open ‘Disk Management’. You can do this by right-clicking the ‘Start’ menu.
- Look for the drive marked as ‘Unknown’ and ‘Not Initialized’.
- Right-click on the space that says ‘Not Initialized’ and select ‘Initialize Disk’.
- Choose the partition style: MBR is good for drives under 2TB, while GPT works for larger drives.
- Confirm your choice and click ‘OK’.
After these steps, the external hard drive should show up in Windows 11. You can then partition and format the drive for use. If your drive still doesn’t appear, ensure it is securely connected and check for any hardware issues. Remember to handle the process with care to avoid data loss.
Assigning Drive Letters to External Hard Drives
If your external hard drive is connected but not showing up in Windows 11, it may lack a drive letter. Without this, the system cannot display or access the drive in File Explorer. Here is a step-by-step guide to assign a drive letter:
- Open Disk Management by right-clicking the Start button and selecting it from the menu.
- Find the external hard drive in the list. It may show as ‘Unallocated’ or ‘RAW’.
- Right-click on the drive and choose ‘Change Drive Letter and Paths…’.
- Click ‘Add’ and pick a letter from the list that is not in use.
- Confirm the selection and click ‘OK’. The drive should now appear in File Explorer.
This process is usually quick and effortless. But if you find the ‘Change Drive Letter and Paths…’ option greyed out, it means the system is restricting changes. In such cases, third-party tools like AOMEI Partition Assistant may help. Remember, if your drive was previously assigned a letter, but it disappeared, there might be deeper issues. You may need to explore other solutions in this blog or consult professional help.
Using Windows 11 Troubleshooting Tools
Windows 11 includes built-in tools to help solve hard drive issues. To start, you can use the Troubleshooter. This tool can find and fix problems with your hardware. To use the Troubleshooter, follow these steps:
- Open the Settings app by pressing Windows+I.
- Choose Update & Security and click on the Troubleshoot tab.
- Select Hardware and Devices and click the Run the troubleshooter button.
The system will check for issues and try to fix them. It may ask for your approval to make changes. Be sure to follow any on-screen instructions. This tool can often fix problems with device recognition and drivers.
If the Troubleshooter does not solve the problem, Windows 11 has another option. The Device Manager allows you to view and manage the hardware for your system. It can be used to check if the external hard drive is visible to the operating system. To check, do the following:
- Right-click on the Start button and select Device Manager.
- Look under Disk drives for your external hard drive.
- If you see a yellow exclamation mark, there may be a driver issue.
Right-click on the drive and select Properties for more details. You might find useful information about the issue. If needed, you can update the drivers here as well.
These Windows 11 tools are powerful and can help you when your external hard drive is not showing up. Use them to get your hard drive working again quickly.
Advanced Solutions: Using AOMEI Partition Assistant
When simpler fixes don’t resolve your external hard drive issues in Windows 11, AOMEI Partition Assistant is a robust tool that can help. This user-friendly software offers more advanced features, easily manage hard drive partitions and fix problems that prevent drives from showing up. Here are some ways AOMEI Partition Assistant can be used:
- Initialize the External Hard Drive: If your new hard drive isn’t initialized, AOMEI can set it up with the correct partition style.
- Re-format Hard Drives: This tool supports various file systems, including NTFS, FAT32, exFAT, and even Ext2/3/4 for Linux partitions.
- Assign or Change Drive Letters: If Windows doesn’t automatically give a letter to your hard drive, AOMEI can assign one for you.
- Check for Errors: Use its Check Partition feature to detect and fix errors in the hard drive’s file system or sectors.
- Recover Lost Partitions: A lost or deleted partition can be restored, which could make your hard drive visible again.
- Migrate OS to SSD or HDD: If you’re upgrading your system, AOMEI can help transfer your operating system to a new drive without reinstallation.
This software is a practical choice when facing stubborn hard drive recognition issues. By helping you manage drive partitions more effectively, AOMEI Partition Assistant can be the solution to getting your external hard drive to show up in Windows 11. Remember always to back up your data before performing any operations that can alter the contents of your drive.